|
|
|
|
|
|||
|
The DEPTHQ projector is set up to take "page-flipped" stereo 3D input from a pc and project stereo for shutter glasses on any surface. NVidia now supports stereo gaming with GeForce cards under Windows Vista.
For non-gamining under XP, we recommend nVidia Quadro cards (such as FX3700) with stereo drivers.
INSTRUCTIONS: HARDWARE 1) Connect emitter adapter to vga out of computer, plug projector cable into projector and adapter. Plug adapter USB plug into computer (optional). 2) Connect EMITTER cable to emitter. If longer reach is necessary, use Serial Mini Din 8 extension cable. 3) Install batteries into shutter glasses (batteries rated for 70 hours continuous use).
|
|||
|
|
|||
|
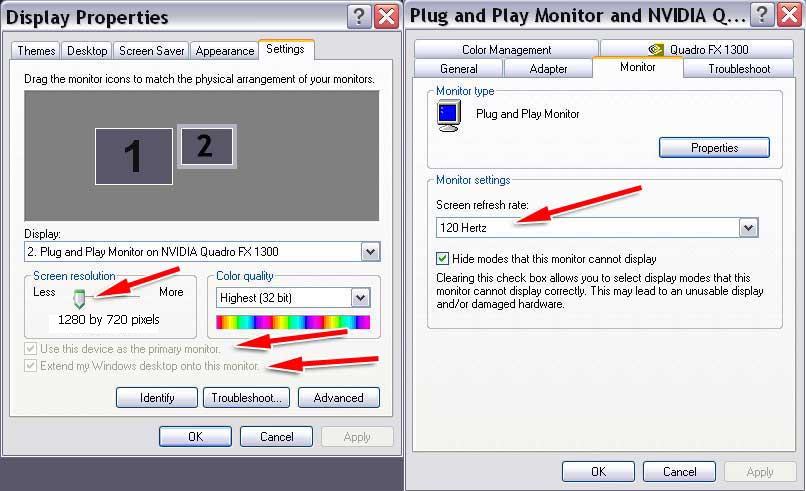
SOFTWARE (Windows XP only, stereo drivers not supported in VISTA). 1) Nvidia QUADRO cards are most likely to support stereo. Enable projector in Display Properties, setting 1280x720 32 bit, Make DepthQ PRIMARY MONITOR. Set monitor refresh at 120 hz.. 2) Enable page-flipping on QUADRO control panel. If not, proceed to 3 (for non quadro cards): 3) Download stereo driver ( we've used 78.01 xp and 84.21 xp for FX 1300, 1400 and 1500 cards, while later cards as the FX3700/3800 can utilize the more recent 182.08 xp. Read installation hints here.) Install driver (make sure anit-virus/Norton is not running. We have found installing "FORCEWARE" unnecessary, but may be needed on your machine. 4) If successful, you are ready for STEREO PHOTO MAKER. Download and install (freeware). Open a stereo image from your hard drive (make sure "Side by Side" format is checked under stereo format. Alternately individual L/R files may be opened). Go to "Stereo" tab and "Page Flip Setup". Select "nVidia" radio button. Hit OK. With any luck, when you hit "F8" on your keyboard, the stereo image will be seen via the DepthQ projector. Make sure emitter and shutter glasses are activated. Hit spacebar to proceed to next image(s), or backspace for previous. Stereo Photo Maker can also be used to view image pairs as anaglyphs on any monitor. (NOTE: If Images appear stretched, run Stereo Photo Maker after setting nVidia parameters, but before hitting OK.) To run stereo videos, use STEREO MOVIE MAKER (NOTE for LAPTOP users!) |
|||
| Enable 2nd monitor (DepthQ projector) make sure it's set to Primary! | |||
|
|||
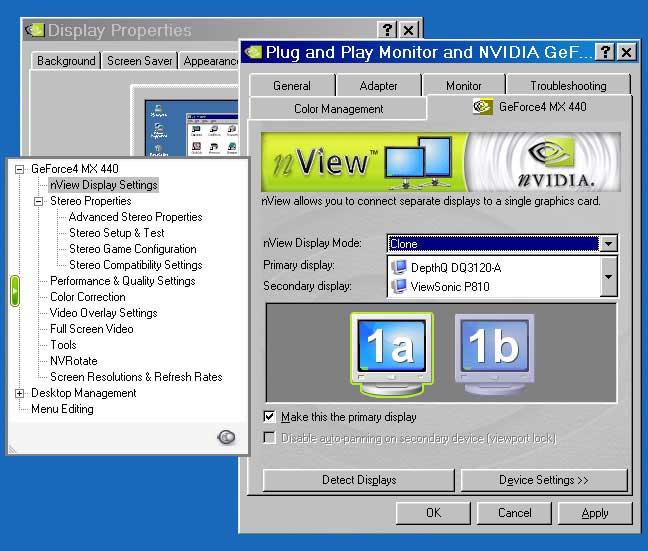
| Alternate method of setting up 2nd monitor | |||
|
|||
| Some nVidia cards are already stereo-enabled. | |||

|
|||
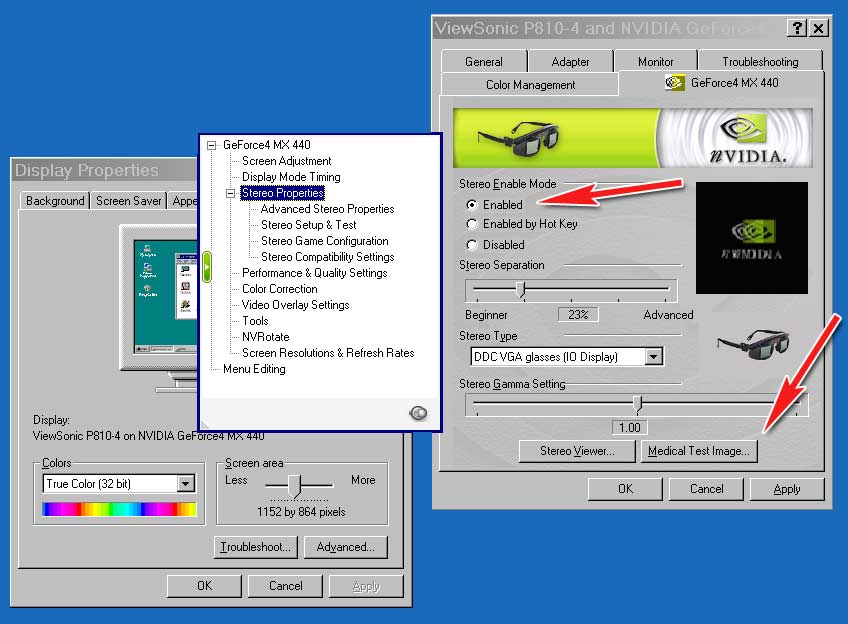
| Enable Stereo Mode, make sure VGA GLASSES is chosen. Notice "Medical Test Image" button (medical?) | |||
|
|||
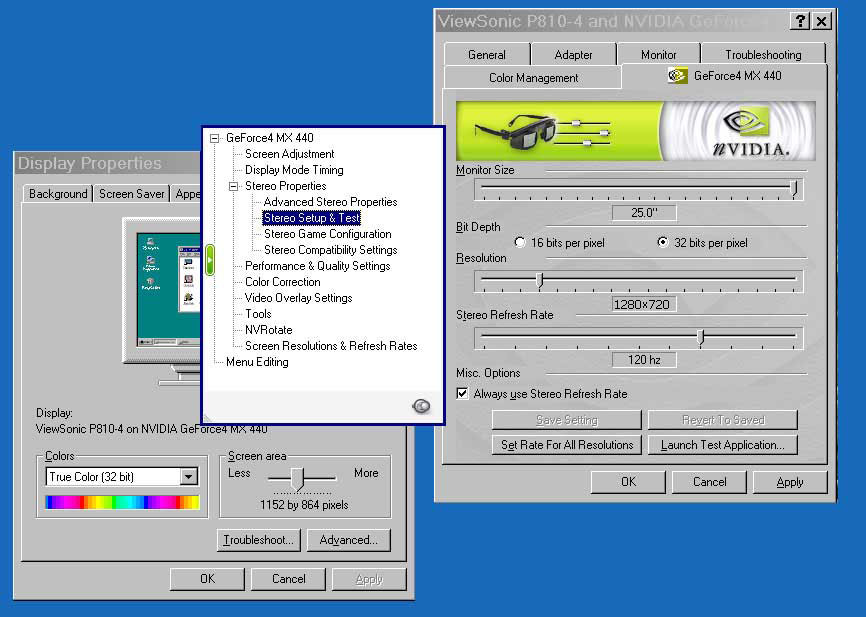
| Set parameters as shown (Monitor Size 25, Bit Depth 32, Resolution 1280x720, Stereo Refresh Rate 120) Check "Always use Stereo Refresh Rate" |
|||
|
|||
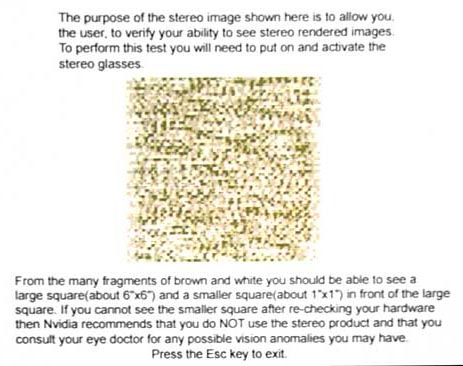 |
The big test! You should definitely see 3D with emitter and glasses activated. A small square will be over or below the big square. If you see TWO of these images side by side, drivers are not properly installed. | ||
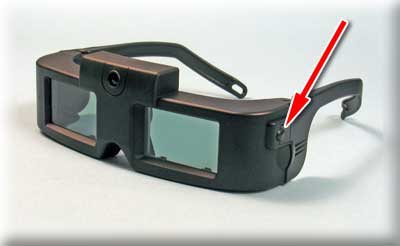 |
Press the left button to activate glasses. Pressing again swaps eye orientation. | ||
|
|
|||
|
Stereo SLIDE Services / Stereo PHOTOGRAPHY / Stereo VIDEO / COMPUTER Stereo /
|